# Render 함수
Vue는 대부분의 경우 템플릿을 사용하여 애플리케이션을 구축할 것을 권장합니다. 그러나 JavaScript가 완전히 필요한 상황이 있습니다. 그럴 땐 render 함수를 사용할 수 있습니다.
어디에서 render() 함수가 실용적일 수 있는지 예제를 봅시다. 우리는 Anchored Heading 을 만들고 싶다고 가정하세요.
<h1>
  <a name="hello-world" href="#hello-world">
    Hello world!
  </a>
</h1>
2
3
4
5
Anchored Heading 는 매우 자주 사용되므로, 컴포넌트를 만들어야 합니다.
<anchored-heading :level="1">Hello world!</anchored-heading>
level 이 컴포넌트는 level prop 기반으로 제목을 생성해야 합니다. 우리는 빠르게 이렇게 만들었습니다.
const app = Vue.createApp({})

app.component('anchored-heading', {
  template: `
    <h1 v-if="level === 1">
      <slot></slot>
    </h1>
    <h2 v-else-if="level === 2">
      <slot></slot>
    </h2>
    <h3 v-else-if="level === 3">
      <slot></slot>
    </h3>
    <h4 v-else-if="level === 4">
      <slot></slot>
    </h4>
    <h5 v-else-if="level === 5">
      <slot></slot>
    </h5>
    <h6 v-else-if="level === 6">
      <slot></slot>
    </h6>
  `,
  props: {
    level: {
      type: Number,
      required: true
    }
  }
})
2
3
4
5
6
7
8
9
10
11
12
13
14
15
16
17
18
19
20
21
22
23
24
25
26
27
28
29
30
이 템플릿은 좋지 못합니다. 장황할 뿐만 아니라, 모든 heading level 에서 <slot></slot>을 중복으로 사용합니다. 그리고 Anchor 를 추가한다면, 우리는 또 다시 v-if/v-else-if를 모든 분기에 반복 해야합니다.
템플릿은 대부분의 컴포넌트에서 잘 작동하지만, 이것은 잘 작동하는 것이 아닙니다. render() 함수로 다시 작성해봅시다.
const app = Vue.createApp({})

app.component('anchored-heading', {
  render() {
    const { h } = Vue

    return h(
      'h' + this.level, // tag name
      {}, // props/attributes
      this.$slots.default() // array of children
    )
  },
  props: {
    level: {
      type: Number,
      required: true
    }
  }
})
2
3
4
5
6
7
8
9
10
11
12
13
14
15
16
17
18
19
render() 함수 구현은 훨씬 간단하지만 컴포넌트 인스턴트 프로퍼티에 대해 더 잘 알고 있어야 합니다. 이경우 v-slot 디렉티브가 없는 자식을 anchored-heading 내부에 Hello world!를 컴포넌트에 전달할 때 해당 자식은 $slots.default() 컴포넌트 인스턴트에 위치하는 것을 알아야 합니다. 잘모르 겠다면, instance properties API 를 render 함수를 살펴보기 전에 읽어 보는 것이 좋습니다.
# DOM 트리
렌더 기능에 대해 알아보기 전에, 조금은 브라우저가 어떻게 작동하는지 알아 보는 것이 중요합니다. 아래 HTML 예제를 봅시다.
<div>
  <h1>My title</h1>
  Some text content
  <!-- TODO: Add tagline -->
</div>
2
3
4
5
브라우저가 이 코드를 읽게 되면, 모든 내용을 추적하기 위해 "DOM 노드" 트리 (opens new window) 를 만듭니다.
위 HTML의 DOM 노드 트리는 아래와 같습니다.
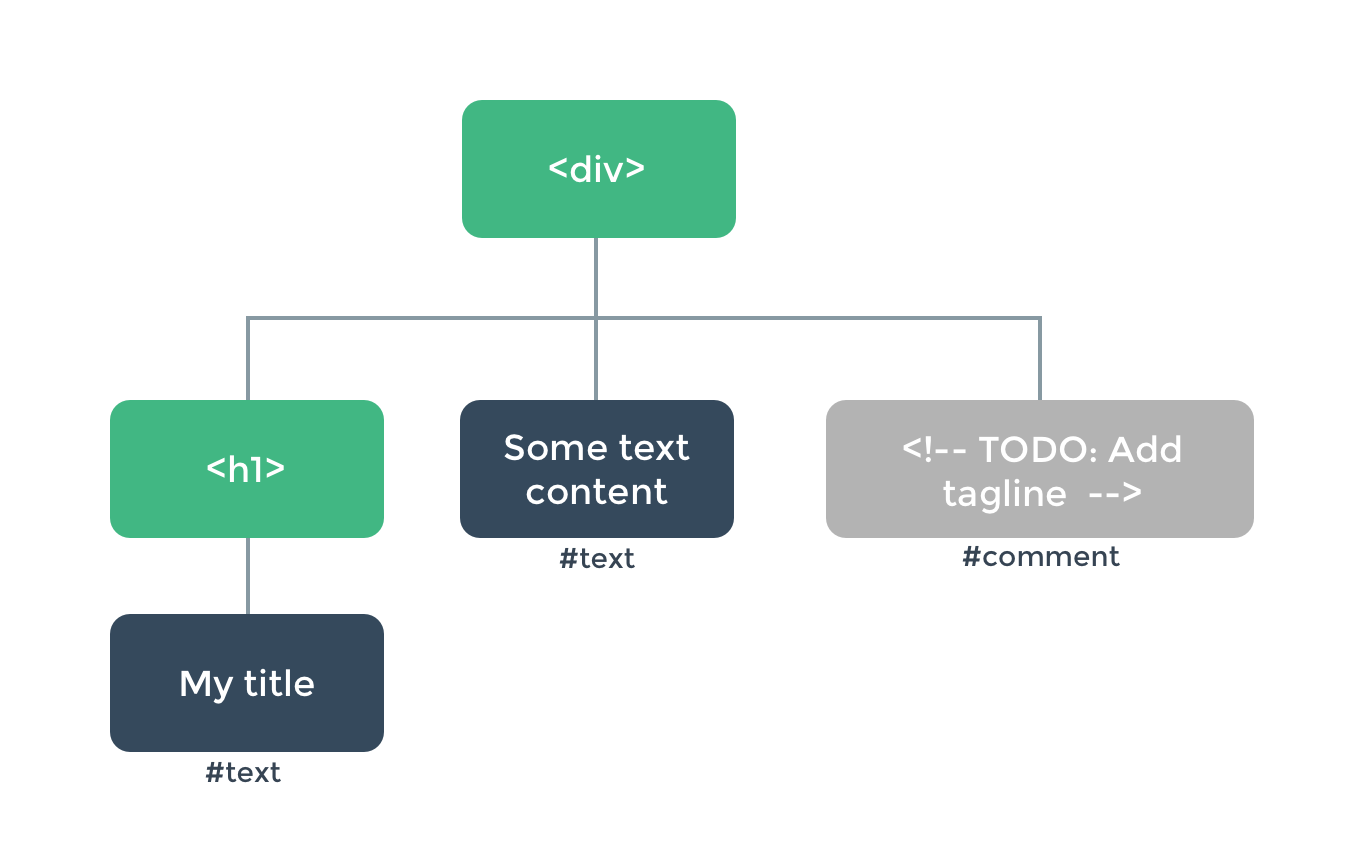
모든 element는 하나의 node입니다. 모든 텍스트도 하나의 노드입니다. 심지어 주석도 노드입니다! 각 노드는 자식을 가질 수 있습니다. (즉, 각 노드는 다른 노드를 포함할 수 있습니다).
모든 노드를 효율적으로 갱신하는 것은 어려울 수 있으나, 다행히 우리는 수동으로 업데이트할 필요가 없습니다. 페이지에서 수정하고 싶은 HTML을 템플릿에 작성하면 Vue가 대신 해줍니다.
<h1>{{ blogTitle }}</h1>
또는 렌더 함수에서 아래와 같이 작성합니다.
render() {
  return Vue.h('h1', {}, this.blogTitle)
}
2
3
두가지 경우 모두, Vue는 블로그Title이 바뀌면 자동으로 페이지를 갱신합니다.
# 가상 DOM 트리
Vue는 실제 DOM에서의 변경사항을 추적하기 위해 가상(Virtual) DOM을 만들어 페이지를 갱신합니다. 이를 자세히 살펴보면 아래와 같습니다.
return Vue.h('h1', {}, this.blogTitle)
h()함수가 반환하는것이 무엇일까요? DOM 같은 것을 반환하는 것으로 보이지만 정확히 실제의 DOM은 아닙니다. 여기에서 반환되는 객체는 모든 하위 노드의 설명을 포함하여, 페이지에 렌더링해야하는 노드의 정보를 Vue에 설명하는 정보를 가집니다. 우리는 이 노드 기술(Description)을 "가상노드(Virtual node)"라고 부르며, 약어로써 VNode 를 사용합니다. 가상 DOM"은 Vue 컴포넌트의 트리로 구축된 VNodes 전체트리를 말합니다.
# h() 전달인자
h()는 VNode를 생성하는 유틸리티 함수입니다. 아마 더 정확한 이름은 createVNode() 이 맞겠지만, 아주 자주 사용되기 때문에 간결하게 하기 위해 h() 라고 이름 지었습니다. 이 함수는 3개의 인자를 받습니다.
// @returns {VNode}
h(
  // {String | Object | Function } tag
  // An HTML tag name, a component or an async component.
  // Using function returning null would render a comment.
  //
  // Required.
  'div',

  // {Object} props
  // An object corresponding to the attributes, props and events
  // we would use in a template.
  //
  // Optional.
  {},

  // {String | Array | Object} children
  // Children VNodes, built using `h()`,
  // or using strings to get 'text VNodes' or
  // an object with slots.
  //
  // Optional.
  [
    'Some text comes first.',
    h('h1', 'A headline'),
    h(MyComponent, {
      someProp: 'foobar'
    })
  ]
)
2
3
4
5
6
7
8
9
10
11
12
13
14
15
16
17
18
19
20
21
22
23
24
25
26
27
28
29
30
# 완전한 예제
이상의 지식을 바탕으로 우리 컴포넌트를 완전히 만들어 봅시다:
const app = Vue.createApp({})

/** Recursively get text from children nodes */
function getChildrenTextContent(children) {
  return children
    .map(node => {
      return typeof node.children === 'string'
        ? node.children
        : Array.isArray(node.children)
        ? getChildrenTextContent(node.children)
        : ''
    })
    .join('')
}

app.component('anchored-heading', {
  render() {
    // create kebab-case id from the text contents of the children
    const headingId = getChildrenTextContent(this.$slots.default())
      .toLowerCase()
      .replace(/\W+/g, '-') // replace non-word characters with dash
      .replace(/(^-|-$)/g, '') // remove leading and trailing dashes

    return Vue.h('h' + this.level, [
      Vue.h(
        'a',
        {
          name: headingId,
          href: '#' + headingId
        },
        this.$slots.default()
      )
    ])
  },
  props: {
    level: {
      type: Number,
      required: true
    }
  }
})
2
3
4
5
6
7
8
9
10
11
12
13
14
15
16
17
18
19
20
21
22
23
24
25
26
27
28
29
30
31
32
33
34
35
36
37
38
39
40
41
# 제약 사항
# VNodes는 고유해야 합니다.
컴포넌트 트리의 모든 VNode는 고유해야 합니다. 아래 예제는 다음 렌더 함수가 잘못된 경우입니다.
render() {
  const myParagraphVNode = Vue.h('p', 'hi')
  return Vue.h('div', [
    // Yikes - duplicate VNodes!
    myParagraphVNode, myParagraphVNode
  ])
}
2
3
4
5
6
7
같은 엘리먼트/컴포넌트를 여러 번 만들려면 팩토리 함수를 사용해서 복제할 수 있습니다. 예를 들어, 다음의 렌더 함수는 20개의 동일한 p태그를 렌더링하는 완벽한 방법입니다.
render() {
  return Vue.h('div',
    Array.apply(null, { length: 20 }).map(() => {
      return Vue.h('p', 'hi')
    })
  )
}
2
3
4
5
6
7
# Template기능을 일반 JavaScript로 변경하기
# v-if 와 v-for
if든, for든 자바스크립트에서 쉽게 해낼수 있는 것이기 때문에 vue 렌더 함수가 별다른것을 제공하지는 않습니다. v-if와 v-for를 사용하는 템플릿을 예로 들어보겠습니다:
<ul v-if="items.length">
  <li v-for="item in items">{{ item.name }}</li>
</ul>
<p v-else>No items found.</p>
2
3
4
위 내용을 JS의 if/else과 map()를 사용하는 렌더 함수로 만들어 보겠습니다:
props: ['items'],
render() {
  if (this.items.length) {
    return Vue.h('ul', this.items.map((item) => {
      return Vue.h('li', item.name)
    }))
  } else {
    return Vue.h('p', 'No items found.')
  }
}
2
3
4
5
6
7
8
9
10
# v-model
v-model 디렉티브는 modelValue로 확장되고, 템플릿 컴파일 과정에 필요한 onUpdate:modelValue props는 우리가 직접 제공해주어야 합니다.
props: ['modelValue'],
render() {
  return Vue.h(SomeComponent, {
    modelValue: this.modelValue,
    'onUpdate:modelValue': value => this.$emit('update:modelValue', value)
  })
}
2
3
4
5
6
7
# v-on
이벤트 핸들러를 위해 적절한 prop 이름을 주어야 합니다. 예. click 이벤트를 처리하기 위해서는 onClick을 prop 명으로 사용해야 합니다.
render() {
  return Vue.h('div', {
    onClick: $event => console.log('clicked', $event.target)
  })
}
2
3
4
5
# 이벤트 수식어
.passive, .capture와 .once 이벤트 수식어의 경우, 카멜케이스(camelCase)를 사용하여 이벤트명 뒤에 연결할 수 있습니다.
예시:
render() {
  return Vue.h('input', {
    onClickCapture: this.doThisInCapturingMode,
    onKeyupOnce: this.doThisOnce,
    onMouseoverOnceCapture: this.doThisOnceInCapturingMode,
  })
}
2
3
4
5
6
7
모든 이벤트와 키 수식어를 처리하기 위한 별도의 API가 필요하지 않습니다. 그저 이벤트 처리를 위한 메소드를 사용하시면 됩니다.
| 수식어 | 핸들러와 동일 |
|---|---|
.stop | event.stopPropagation() |
.prevent | event.preventDefault() |
.self | if (event.target !== event.currentTarget) return |
Keys:.enter, .13 | if (event.keyCode !== 13) return (다른 키 수정자를 위해 13을 또 다른 키 코드 (opens new window)로 변경하십시오.) |
Modifiers Keys:.ctrl, .alt, .shift, .meta | if (!event.ctrlKey) return (ctrlKey를 각각 altKey, shiftKey, 또는 metaKey로 변경합니다.) |
다음은 이러한 모든 수식어를 함께 사용하는 예입니다:
render() {
  return Vue.h('input', {
    onKeyUp: event => {
      // Abort if the element emitting the event is not
      // the element the event is bound to
      if (event.target !== event.currentTarget) return
      // Abort if the key that went up is not the enter
      // key (13) and the shift key was not held down
      // at the same time
      if (!event.shiftKey || event.keyCode !== 13) return
      // Stop event propagation
      event.stopPropagation()
      // Prevent the default keyup handler for this element
      event.preventDefault()
      // ...
    }
  })
}
2
3
4
5
6
7
8
9
10
11
12
13
14
15
16
17
18
# Slots
You can access slot contents as Arrays of VNodes from this.$slots:
render() {
  // `<div><slot></slot></div>`
  return Vue.h('div', {}, this.$slots.default())
}
2
3
4
props: ['message'],
render() {
  // `<div><slot :text="message"></slot></div>`
  return Vue.h('div', {}, this.$slots.default({
    text: this.message
  }))
}
2
3
4
5
6
7
렌더 함수를 사용해서 슬롯을 하위 컴포넌트로 전달하려면
render() {
  // `<div><child v-slot="props"><span>{{ props.text }}</span></child></div>`
  return Vue.h('div', [
    Vue.h('child', {}, {
      // pass `slots` as the children object
      // in the form of { name: props => VNode | Array<VNode> }
      default: (props) => Vue.h('span', props.text)
    })
  ])
}
2
3
4
5
6
7
8
9
10
# JSX
render 함수 안에서 많은 코드를 작성해야 한다면 좀 고통스러울수 있습니다.
Vue.h(
  Vue.resolveComponent('anchored-heading'),
  {
    level: 1
  },
  [Vue.h('span', 'Hello'), ' world!']
)
2
3
4
5
6
7
특히, 템플릿으로 이 기능을 만들었을때 너무 간결해서 비교가 심하게 되면 더더욱 그럴겁니다.
<anchored-heading :level="1"> <span>Hello</span> world! </anchored-heading>
바로 이런 경우를 위해 JSX를 뷰와 함게 사용하기 위해 Babel plugin (opens new window) 를 적용해서, 좀더 템플릿 코드와 비슷하게 만들수 있게됩니다.
import AnchoredHeading from './AnchoredHeading.vue'

const app = createApp({
  render() {
    return (
      <AnchoredHeading level={1}>
        <span>Hello</span> world!
      </AnchoredHeading>
    )
  }
})

app.mount('#demo')
2
3
4
5
6
7
8
9
10
11
12
13
JSX가 JavaScript에 매핑하는 방법에 대한 자세한 내용은 사용 문서 (opens new window) 를 참조하십시오.
# 템플릿 컴파일
Vue의 템플릿이 실제로 render 함수로 컴파일 되는지 알고 싶을 것입니다. 이는 일반적으로 알 필요가 없는 내부 구현 사항이지만, 특정 템플릿 기능이 어떻게 컴파일 되는지 알고 싶다면, 흥미로울 수 있습니다. 다음은 Vue.compile 을 사용하여 템플릿 문자열을 라이브 컴파일하는 데모입니다.