# 싱글 파일 컴포넌트
# 소개
많은 Vue 프로젝트에서, 전역 컴포넌트는 app.component()를 사용해서 정의되고, 뒤따라 app.mount('#app')를 통해 모든 페이지의 body 안에 있는 컨네이너 요소로 지정됩니다.
이것은 특정 뷰(views)를 향상시키기 위해서 JavaScript를 사용하는 중소 규모의 프로젝트에서는 매우 잘 동작할 것입니다. 하지만 더 복잡한 프로젝트나 프론트 엔드가 전적으로 JavaScript에 의해 구동되는 경우 다음과 같은 단점이 명백해집니다.
- 전역 정의 모든 컴포넌트마다 고유한 이름을 가져야만 합니다
- 문자열 템플릿 구문 강조가 부족하고, 여러 줄의 HTML을 위해 예쁘지 않은 슬래쉬 사용해야 합니다.
- CSS가 지원되지 않음 HTML과 JavaScript는 컴포넌트로 모듈화되지만 CSS는 제외됩니다(conspicuously left out).
- 빌드 단계가 없음 Pug(이전의 Jade)나 Babel 같은 전처리기보다 HTML과 ES5 JavaScript를 사용하는데 제한됩니다.
이 모든 문제는 .vue 확장자와 싱글 파일 컴포넌트를 사용한다면 Webpack이나 Browserify와 같은 빌드 도구로 해결할 수 있습니다.
여기에 예제 파일 Hello.vue가 있습니다:
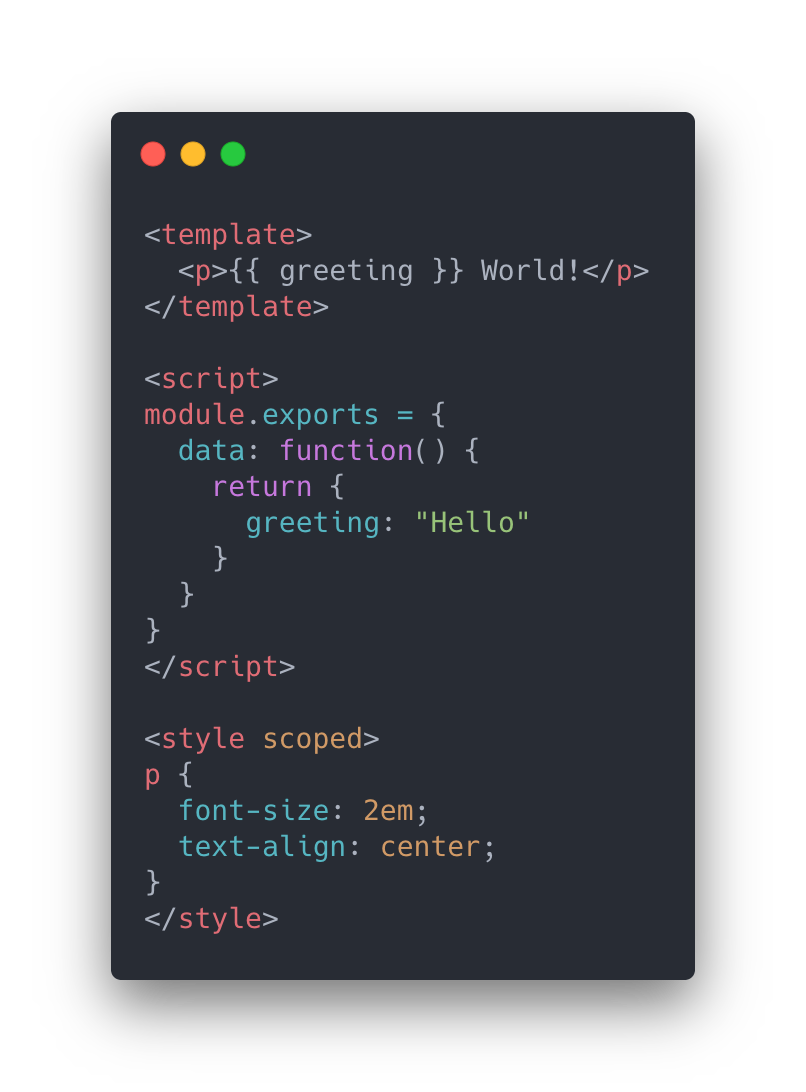
이제 우리는 다음과 같은 이점을 얻습는다:
위에 언급한대로, 깔끔하고 기능이 많은 컴포넌트를 위해 Pug, Babel (with ES2015 modules), Stylus와 같은 전처리기를 사용할 수 있습니다.
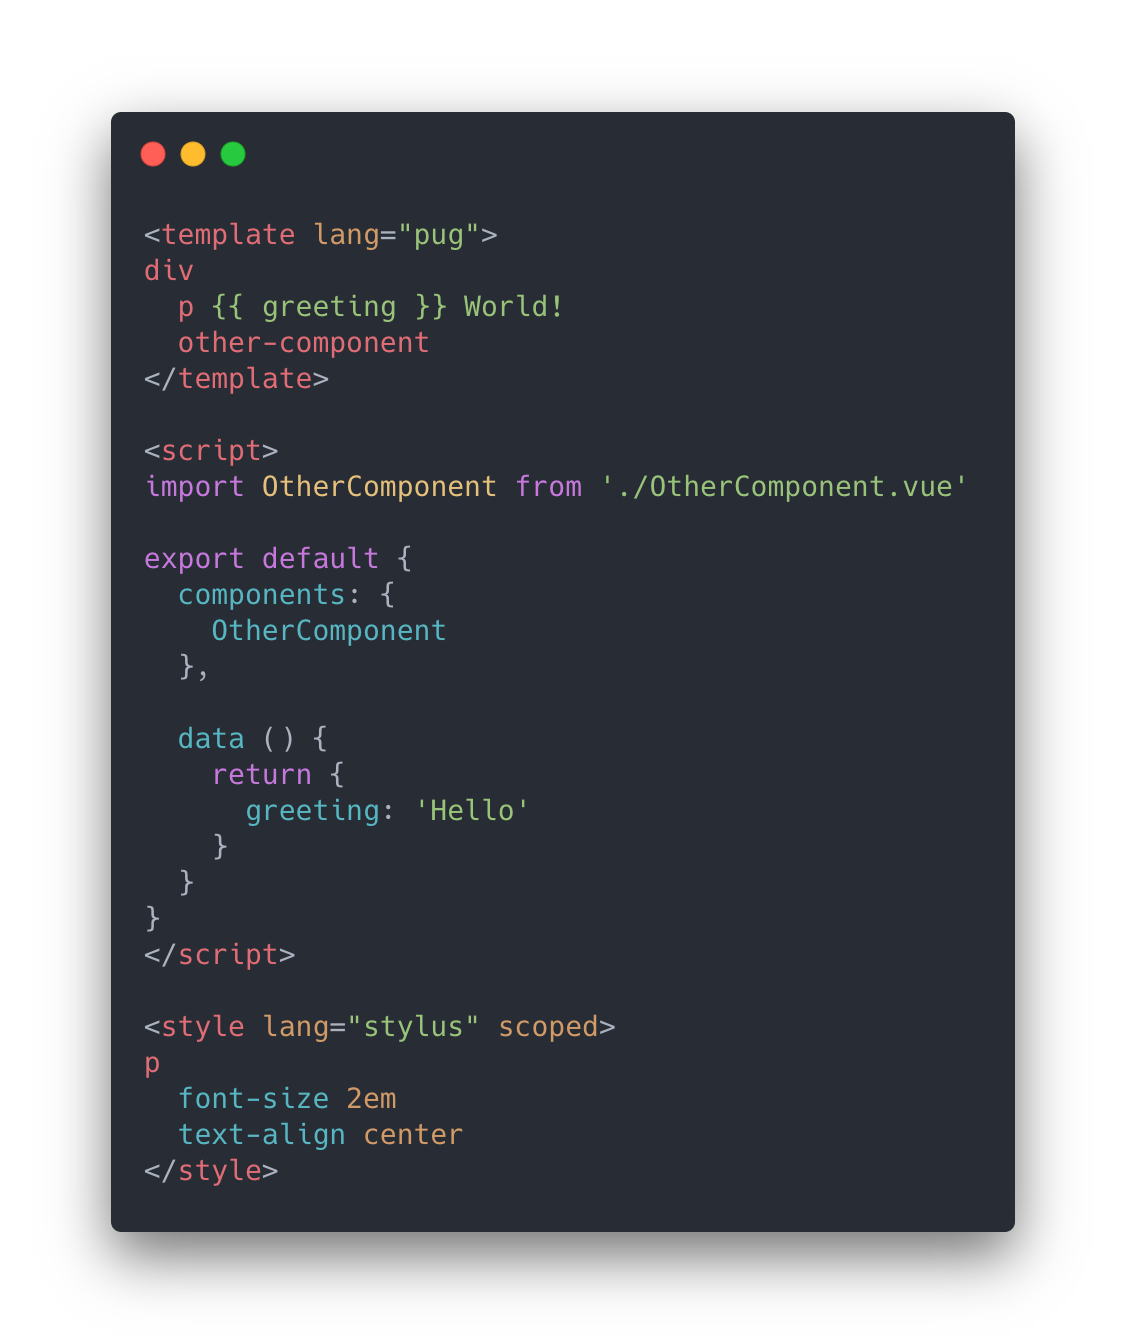
위의 특정한 전처리기(specific languages)는 예시일 뿐입니다. TypeScript, SCSS, PostCSS와 같은 생산성에 도움이 되는 어떤 전처리기도 쉽게 사용할수 있습니다. WebPack과 vue-loader를 사용한다면 CSS 모듈에 대해 최고 수준(first-class)의 지원을 제공합니다.
# 관심 사항 분리
한 가지 중요한 점은 관심 사항 분리와 파일 형태의 분리는 동일하지 않다는 것입니다. 모던 UI 개발에서, 코드 베이스를 서로 얽혀있는 거대한 3개의 레이어로 나누는 대신, 느슨하게 결합된 컴포넌트로 나누고 구성하는 것이 훨씬 더 합리적(sense)이라는 것을 발견했습니다. 컴포넌트 내부에서 컴포넌트의 템플릿, 로직, 스타일은 본질적으로 결합되어 있고, 이것들을 배치하면 컴포넌트를 더욱 결합력 있고 유지 관리가 용이하게 해줍니다.
싱글 파일 컴포넌트에 대한 개념이 맘에 들지 않더라도, JavaScript와 CSS를 별도의 파일로 분리하여, 핫-리로딩과 사전 컴파일 기능에 활용할 수 있습니다.
<!-- my-component.vue -->
<template>
  <div>사전 컴파일 될 것이다</div>
</template>
<script src="./my-component.js"></script>
<style src="./my-component.css"></style>
2
3
4
5
6
# 시작하기
# 예제 Sandbox
지금 싱글 파일 컴포넌트를 사용해보기 원한다면 CodeSandbox에 있는 간단한 todo app (opens new window)을 다뤄볼 수 있습니다.
# 처음으로 JavaScript 모듈 빌드 시스템을 사용하는 사용자의 경우
.vue 컴포넌트를 사용한다면, 진보된(advanced) JavaScript 앱 영역에 진입하는 것입니다. 즉, 아직 사용해보지 않은 추가적인 도구를 사용하는 방법을 배워야합니다.
Node Package Manager (NPM): 레지스트리에서 패키지를 가져오는 방법에 대한 섹션 Getting Started guide (opens new window)를 읽어야 합니다.
Modern JavaScript with ES2015/16: 바벨의 Learn ES2015 guide (opens new window)를 읽어라. 지금 당장 모든 기능을 외워야하진 않지만, 페이지를 다시 참조할 수 있도록 보관해야 합니다.
하루 동안 이러한 자료를 읽은 후, Vue CLI (opens new window)를 살펴보는 것을 권장합니다. 소개(instructions)에 따르면 .vue 컴포넌트, ES2015, webpack and hot-reloading이 포함된 Vue 프로젝트가 즉시 생성할 수 있습니다.
# 숙련된 사용자의 경우
CLI가 대부분의 도구 구성을 설정해주지만, 세세한 옵션에 대해 구성 옵션(config option) (opens new window)을 통해 사용자 정의도 가능합니다.
처음부터 설정하려는 경우, vue-loader (opens new window)를 사용하여 webpack을 수동으로 구성해야 합니다. 웹팩에 대해 더 자세히 알아보려면 공식 문서나 webpack learning academy를 살펴보세요.
# Building with rollup
Most of the time when developing a third-party library we want to build it in a way that allows the consumers of the library to tree shake (opens new window) it. To enable tree-shaking we need to build esm modules. Since webpack and, in turn, vue-cli do not support building esm modules we need to rely on rollup (opens new window).
# Installing Rollup
We will need to install Rollup and a few dependencies:
npm install --save-dev rollup @rollup/plugin-commonjs rollup-plugin-vue
These are the minimal amount of rollup plugins that we need to use to compile the code in an esm module. We may want to also add rollup-plugin-babel (opens new window) to transpile their code and node-resolve (opens new window) if we use dependencies that we want to bundle with our library.
# Configuring Rollup
To configure our build with Rollup we will need to create a rollup.config.js file in the root of our project:
touch rollup.config.js
Once the file is created we will need to open it with our editor of choice and add the following code.
// import our third party plugins
import commonjs from 'rollup-plugin-commonjs'
import VuePlugin from 'rollup-plugin-vue'
import pkg from './package.json' // import our package.json file to re-use the naming

export default {
  // this is the file containing all our exported components/functions
  input: 'src/index.js',
  // this is an array of outputed formats
  output: [
    {
      file: pkg.module, // the name of our esm librry
      format: 'esm', // the format of choice
      sourcemap: true, // ask rollup to include sourcemaps
    }
  ],
  // this is an array of the plugins that we are including
  plugins: [
    commonjs(),
    VuePlugin()
  ],
  // ask rollup to not bundle Vue in the library
  external: ['vue']
}
2
3
4
5
6
7
8
9
10
11
12
13
14
15
16
17
18
19
20
21
22
23
24
# Configuring package.json
To take advantage of our newly created esm module we need to add a few fields in our package.json file:
 "scripts": {
   ...
   "build": "rollup -c rollup.config.js",
   ...
 },
 "module": "dist/my-library-name.esm.js",
 "files": [
   "dist/",
 ],
2
3
4
5
6
7
8
9
Here we are specifying:
- how to build our package
- what files we want to bundle in our package
- what file represents our
esmmodule
# Bundling umd and cjs modules
To also build umd and cjs modules we can simply add a few lines of configuration to our rollup.config.js and package.json
# rollup.config.js
output: [
  ...
   {
      file: pkg.main,
      format: 'cjs',
      sourcemap: true,
    },
    {
      file: pkg.unpkg,
      format: 'umd',
      name: 'MyLibraryName',
      sourcemap: true,
      globals: {
        vue: 'Vue',
      },
    },
]
2
3
4
5
6
7
8
9
10
11
12
13
14
15
16
17
# package.json
"module": "dist/my-library-name.esm.js",
"main": "dist/my-library-name.cjs.js",
"unpkg": "dist/my-library-name.global.js",
2
3
← Vue 2의 변경 감지 주의사항 테스팅 →